I want more control over what my microphone picks up on screen share in video conferences or during streaming but I don’t want to buy a hardware mixer. I also want to be able to disable the microphone with a hotkey but it doesn’t have any physical switch. So achieve all this I utilise PipeWire to run a bunch of virtual devices that I can control via pavucontrol and obs later. Video conferences get this as “default device” so they don’t get a chance to mess up my audio setup (looking at you Teams). The steps are the same for PulseAudio if you don’t have PipeWire (yet).

#!/bin/sh
# setup virtual device intended for monitoring
pactl load-module module-null-sink sink_name="BekoBlaster" device.icon_name="audio-card-analog" node.nick="BekoBlaster" node.description="BekoBlaster-16" sink_properties=device.description="BekoBlaster-16"
# setup virtual MIC so intended monitoring device can be recorded from as MIC
pactl load-module module-remap-source master="BekoBlaster.monitor" node.nick="BekoMic" device.icon_name="audio-input-microphone" source_name="BekoMic-16" source_properties=device.description="BekoMic-16"
# IMPORTANT:
# RUN `pavucontrol` => Select Tab Record => Set BekoMic-16 input to "Monitor of BekoBlaster-16"

The 16 is not important. It’s just my kind of humour as my first Linux PC had a SoundBlaster16 😛 It also is a pattern sufficient enough so I don’t mix this up with the zoo of real microphones or audio sinks attached to my computer.

This is already sufficient enough so that everything played on the device BekoBlaster-16 can be recorded on the BekoMic-16 again, that I select as input microphone for Browser (video conferences) or Discord at this point. This can be done with pavucontrol – or later in obs.

This isn’t enough, of course. In case of e.g. playing music (or streaming a game) I’d also want to hear the sound myself too. For this I create an additional null sink and a combined sink. With this approach I can later fine tune in obs what gets recorded to which audio track (where audio track 1 is the one used for streaming) and what ends up on the BekoBlaster-16, that acts as my monitor and due to the remapped source also as virtual mic.

# setup virtual device for games (or whatever OBS should record)
pactl load-module module-null-sink sink_name="OBS-Blaster" device.icon_name="audio-card-analog" node.nick="OBS-Blaster" node.description="OBS-Blaster" sink_properties=device.description="OBS-Blaster"
# OPTIONAL setup a combined sink so I can enjoy game sound while OBS gets a copy
pactl load-module module-combine-sink slaves="OBS-Blaster,bluez_output.10_4F_A8_84_18_01.a2dp-sink" node.nick="OBS-Blaster-AND-Headphones" node.description="OBS-Blaster-AND-Headphones" sink_properties=device.description="OBS-Blaster-AND-Headphones"
# Important tools to manipulate: `pw-cli list-objects`, `pw-cli destroy $id`, `pactl list short | grep module`, `pactl unload-module $id`

With this (and my headset connected) it starts to get crowded in my device list.

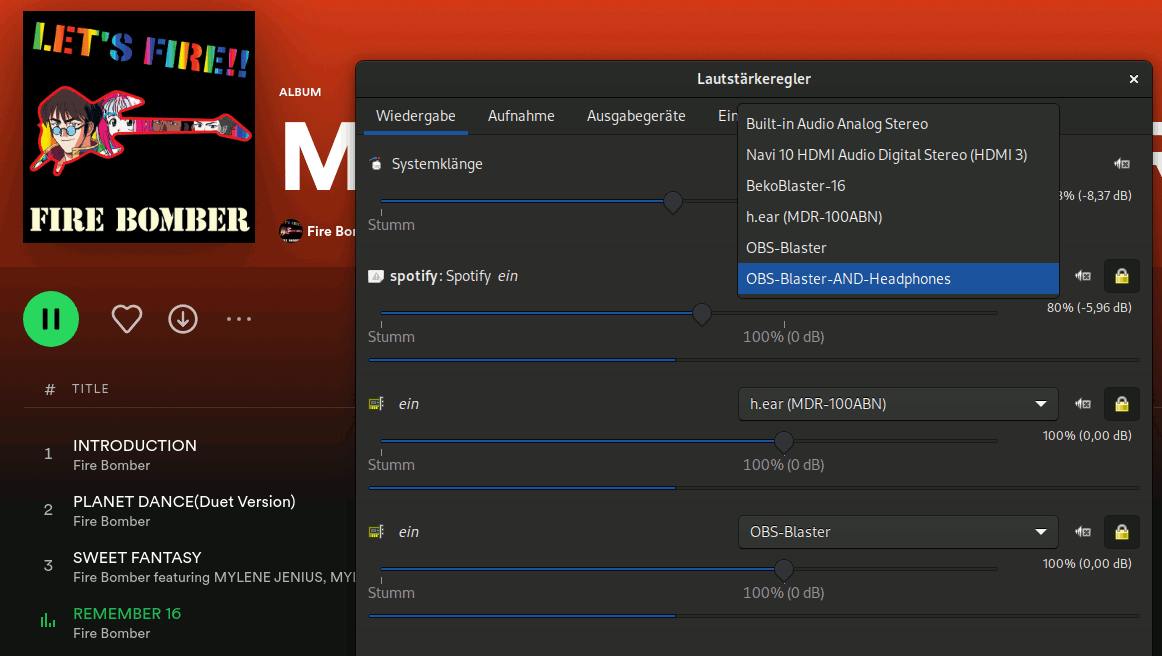
As you can hear err… hopefully see: The sink OBS-Blaster-AND-Headphones is now selected for playing music which results in the music being played on the next virtual sink OBS-Blaster and my h.ear (MDR-100ABN) headphones. The same could be done with the BekoBlaster-16, of course, but bear with me. We still don’t have any real microphone added to the mix and while this can be done with PipeWire or PulseAudio alone too I need this usually with video included too so obs it is.

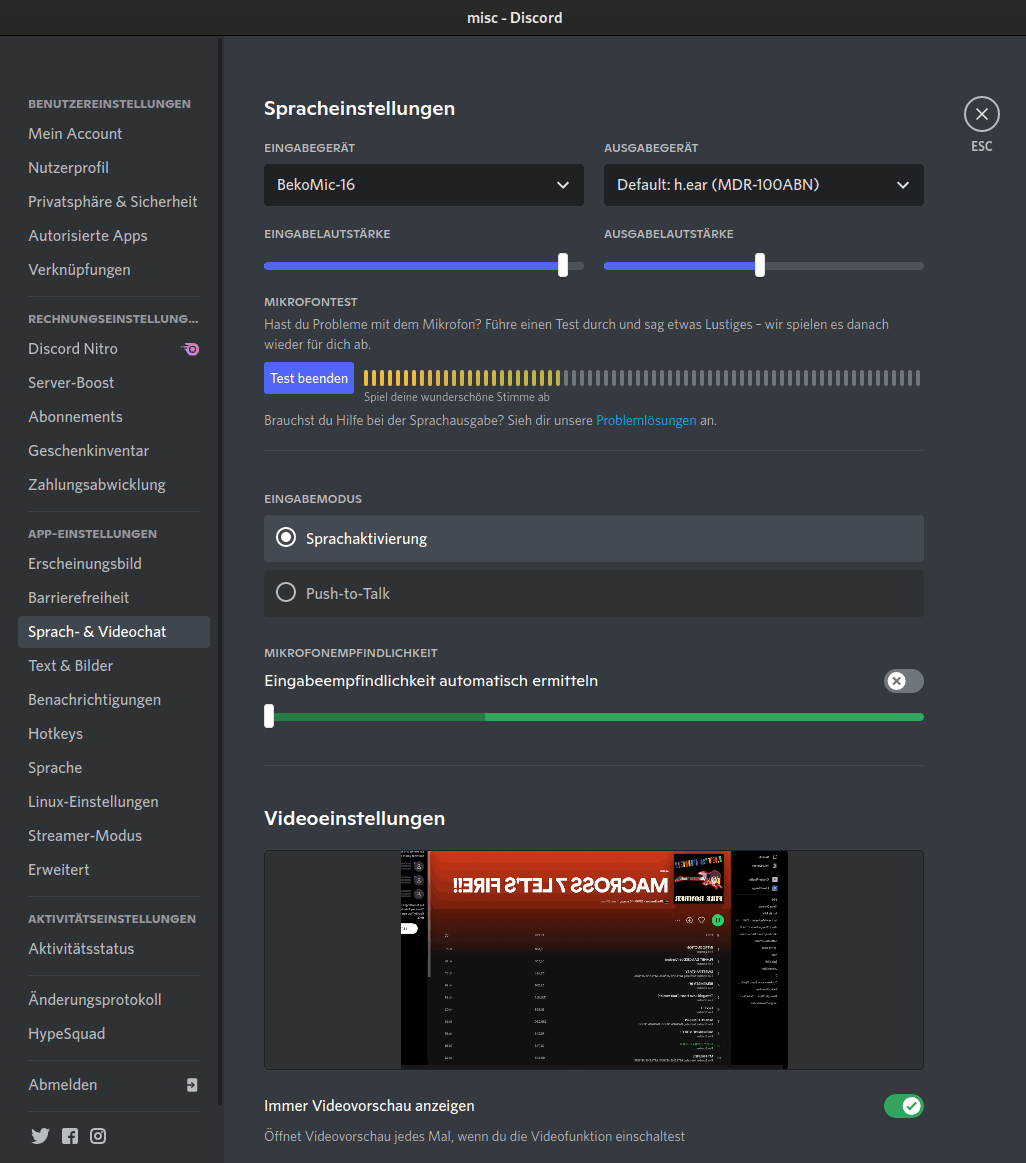
Here the most important setting is the monitoring device, which is the BekoBlaster-16 from the beginning, that can be used as microphone in e.g. Discord later again.

Next is the set-up of the mixer where I’m interested in 4 devices only:

  • The BekoMic-16 without monitor (it is the monitor so this would result in an echo chamber) and optional track 5 for recording (so I’ll know later how the mix sounded – but this is never used for video editing later).
  • The desktop audio without monitor, so random system sounds (or other Discord voices!) don’t make it to any stream. It can be recorded on it’s own track tho in case I fcked up or need a reference later on during editing.
  • The Mic/Aux, which represents the real microphone used. It is echoed on the monitor microphone and on track 1 (send to my streaming server) and on track 2 so I have a separate microphone track later to work with in post edit.
  • The OBS-Blaster, which usually represents the game I’m playing. It is echoed on the monitor microphone and on track 1 (send to my streaming server) and on track 4 so I have a separate game/music track later to work with in post edit.

This way I can control in great detail what ends up on the Discord / a video conference / game streaming, while I get the full power of obs scenes (where I also do my greenscreen mixing), mute microphones as I see fit and have some material to work with later when I decide to make a video on stuff. Here I did set up Discord to read from the virtual BekoMic-16 and output to my headphones only (where no recording in OBS is done) – so perfect for most Discord / video conference sessions.

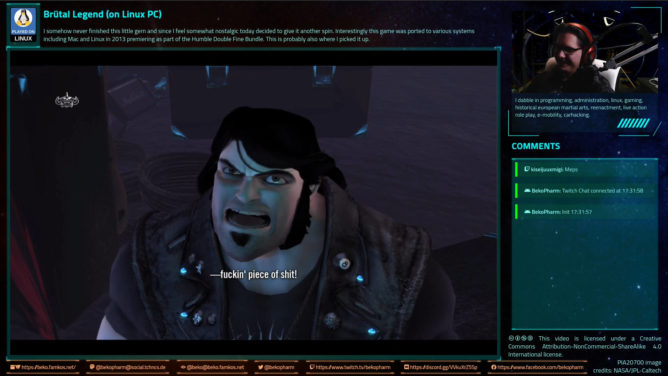
Don’t mind the flipped video preview. That’s perfectly fine and will look right for the viewers later. This is by the way the virtual camera sink feature of obs and the v4l2loopback kernel driver that I also read from in video conferences instead of the real webcam. This way I can also control exactly what the webcam shows – zoom / crop included.

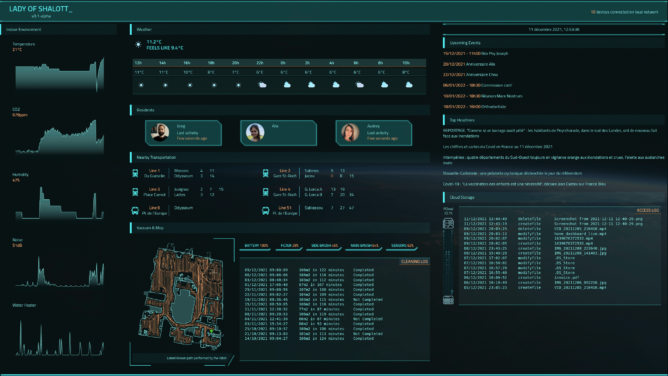
The whole mess looks like this visualised in helvum, a patchbay for PipeWire.

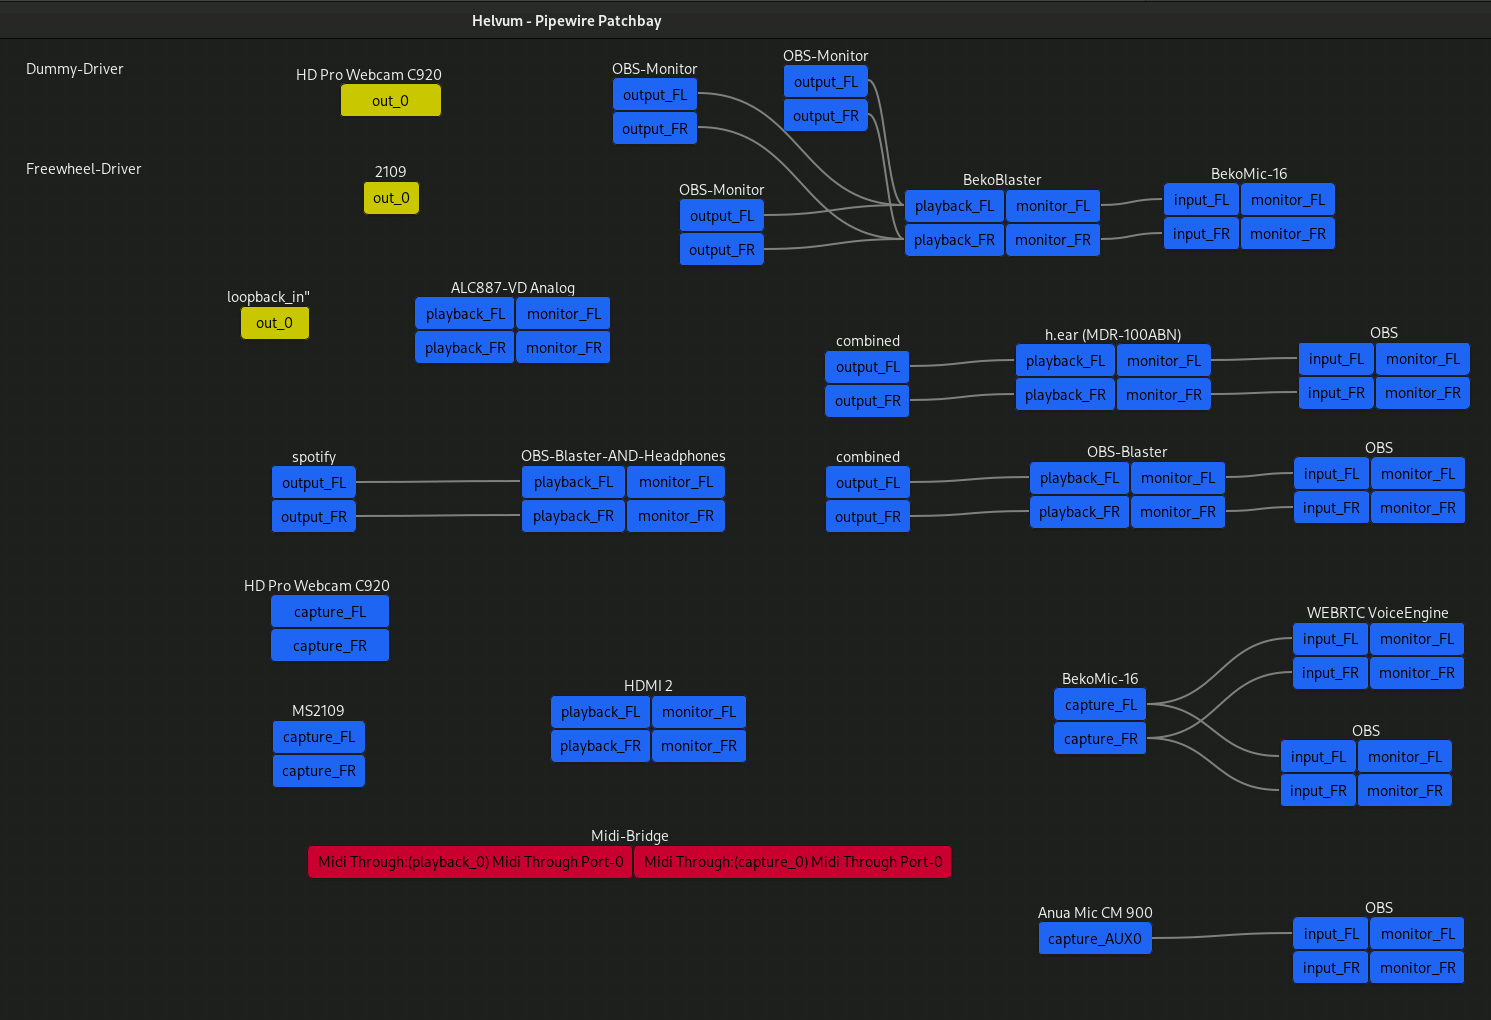
Most of this explains itself. The WEBRTC VoiceEngine is the recording of Discord. Other devices may float around but are not used at the moment of this snapshot.

More on this and proper documentation: https://gitlab.freedesktop.org/pipewire/pipewire/-/wikis/Virtual-Devices

You probably heard about this before: An Arduino can be made into an excellent DIY joystick. Most examples use a Leonardo or Micro for this for a very good reason. They one comes basically with a chip that is recognized as HID (Human Interface Device) hardware on any modern operating system.

This is not the case with a Mega. This one has other perks but HID it is not. It sure shows up as USB device and a ttyUSB is raised where serial communications with the Arduino can be initiated. I’m also aware that some flash the built in programmer of the Mega so it starts operating like the others (which obviously removed the built in programmer). I’m on Linux PC though so I thought it’s basically a job of tricking the system into recognizing it as joystick and call it a day and OMG was I wrong!

How it’s not done

My train of thoughts was like this: Linux still supports plenty of old serial joysticks so how complicated can it be to send some bits an existing driver recognizes. Old hardware like this is usually glued to the driver with the tool inputattach of the Linux Console Project. This does basically initialise a joystick on some serial connection and sends it off to a fitting kernel driver. This way even non-USB, or let’s better say non-HID hardware, is mapped to a kernel driver who in return will set-up the joystick subsystem and manage the communication with the stick via a serial connection.

Turns out I’m not the first one with that idea and apparently someone made it work by connecting old Playstation Controller and a Wii Classic Controller to an Ardunio and fake a Stinger device without the use of HID so Kudos to Jarno Lehtinen here and his Linux-Arduino-Serial-Joystick repo – you sure did sent me down a rabbit hole of horror and amazement. I couldn’t even get inputattach to wait for that magic string to be sent with anything else than 9600 baud and aligned stars! I also had to throw socat into this horrible mix because the Arduino would insist on rebooting on init so a timeout was guaranteed! In case you wonder how I did this:

socat -r left.raw -R right.raw pipe:/dev/ttyUSB0 PTY,link=/dev/ttyUSB1,rawer
# and xdd to show me the debug juice
tail -f left.raw | xxd -c4
# and on yet another terminal
inputattach --baud 9600 --stinger /dev/ttyUSB1

This also meant that I had to tear everything down for reprogramming the Arduino. Anyway, in the end I could finally get through that init phase where the stinger related code in inputattach is waiting for the magic key after sending “ E5E5” to finally load the Stinger kernel driver – communication for both ways confirmed!

    // "\r\n0600520058C272";
    byte byteResponse[] = {0x0D, 0x0A, 0x30, 0x36, 0x30, 0x30, 0x35, 0x32, 0x30, 0x30, 0x35, 0x38, 0x43, 0x32, 0x37, 0x32};
    if (Serial.availableForWrite() >= sizeof(byteResponse))
    {
      Serial.write(byteResponse, sizeof(byteResponse));
    }

At this point I had a pipe to prevent the timeout due to the resetting Arduino, the _only_ working baud rate 9600 I could figure out with the Mega, a loaded driver that was recognized as joystick and was sitting put and did… absolutely nothing. Null. Nada. Not a single bit made it to the driver and I could not figure out why. My guess is it needs a change in the baud rate to the original 1200 (?) of the Stinger but I have no idea if this is true. I could also not find any way how the stream is controlled and since the driver would fill up 2 bytes all the time and interpret them there is a fair chance that it would simply be one byte off all the time. Speculations tho, I simply didn’t grasp the stinger.c source so this is all just a theory. I do not want to admit how much time I sunk into this and I was pretty frustrated at this point. Reading some stupid serial? Not like this! Too many hoops!

So I threw it all in the bin 🚮

How it’s probably done

Say hi to /dev/uinput where you can basically raise virtual devices, like a joystick, without [much?] pain. I’m not the first one, of course, and funny enough the reason behind is very similar to mine. Read more on Virtual joystick on Linux by Gwilym Kuiper where this is all explained in great detail. The referred code at https://github.com/gwilymk/arduino-joystick sure did help me to get started and even without having touched Rust ever before I was able to quickly adjust this for my needs, doubling the possible buttons and get it up and running in just a few hours for my Linux PC. Cheers mate (also Jarno Lehtinen – you teached me a lot that day :D) 🕹️

So here it is: A Mega acting as joystick without HID over a serial connection driven by a userspace daemon (means no kernel driver required) written in Rust providing a virtual uinput device for a joystick on the “modern” event system. Heck it’s even recognized in Wine!

What a journey to begin with. Now I need a back-channel for my blinky lights so I get my Raspberry Pi back from simpit duty 🙃

Behind the scenes recording so you get the idea of the setup followed by some Star Citizen gameplay:

DIY headtracker and Simpit and Star Citizen gameplay (on Linux PC)

In use:

* A Linux PC
* A DIY Headtracker
* A DIY Joystick “Primary Buffer Panel
* A X52 Pro HOTAS
* 3 Cameras + Recording Software
* An AMD RX5600XT in tears
* …a Beko learning How To Fly in SC xD

So you _still_ think you can’t space pew pew on Linux PC? Think again. I do it all the time: https://beko.famkos.net/2021/10/16/space-pew-pew-on-linux-pc/

Updated: This content is obsolete. Two years later I rebuilt the cardboard version with something more sturdy and raised a dedicated project website describing the builds: SimPit.dev

Here is another awesome example using https://www.myxouz.com/2021/12/lady-of-shalott-first-version-of-our-home-dashboard/ 👍

A FUI is short for a Futuristic User Interface. ARWES.dev is a JS framework to create such a FUI. Unlike the ones animated and used for cinematic purposes it can be actually used. Like I do this for my Streaming Overlay and going to use it for my as well.

I love everything about this project right up to it’s name “Lady of Shalott”. The idea to do some sort of extended home automation to query various daily streams is one of the reasons I dig MicroSub and ActivityPub so much and doing something similar for a dashboard crossed my mind already too. This is a topic I’m not doing much on at the moment. I mean I’ve very good ideas what I want here but I’ve already enough projects going at the moment so this is on hold.

Anyway, make sure to take a closer lock on the project. Myxouz offers some (unlisted) YouTube videos as well so you can get an idea of the dashboard in action and also describes the background techniques in use.

If you’re a developer consider going wild with ARWES as well 🙃

I sure am playing a lot of space pew pew over the last months. Took a lot of screenshots too and it’s kinda hard not to drown my timeline with screenshots every day. Today I sifted through the pile and found a bunch I’d like to share (some again) so here is a little gallery of (mostly) space simulation games I play on my Linux PC. And I’ll keep making that point until I can browse the web without getting daily reminders by random strangers claiming that gaming on Linux PC is not possible. Cuz it is.

Added on 5th January 2022 and played with whatever Lutris thinks best. I really was going to hold out on Star Citizen a little longer but I got it as a gift to my birthday. My GPU is definitely at it’s limit here. Will probably have to give it some more time. I mean it’s Alpha and all but hey, it _does_ work.

This I play mostly under Proton with the Primary Buffer Panel whenever possible. It’s just the most fun this way (kids love it too).


The more recent X series have native Linux builds but work also perfectly fine with Wine.


Both run via Lutris and with Proton-GE and usually with my DIY Headtracker.


FlightGear runs native on Linux and Fly Dangerous does have a native Linux build but due to an issue with terrain generation being single threaded I use Proton for this one too until this is solved. No Man’s Sky runs perfectly with Proton.

I play all of the above with my X52 Pro H.O.T.A.S. and some with my DIY headtracker stretched over three displays in a so called multihead setup. Let me know if you’ve any questions how this can be set up.

It’s for science, right?

Apparently the growth of the was examined in a study. It’s and was released on the 1st September 2021:

https://doi.org/10.1007/s41109-021-00392-5

I track my working hours with timewarrior. That’s a CLI program that has a lot of nifty features and can also be hobbled together with taskwarrior to automated time tracking when a task is started. The taskwarrior on the other hand gets my todo list from various bugtrackers as sources, like Redmine and Jira, using bugwarrior-pull.

With this set-up I’ve my to-dos and my tracked hours available on the terminal, where I spend most of the day anyway. This is more or less comfortable for me but there is a huge drawback.

At the end of the months I’ll need some numbers and as it goes each company or customer has it’s own time tracking system (or even wants a csv export!) so I’ve to backfill the real systems each month. That’s a very tedious work especially if time has to be logged on specific tickets or customers and booking is done with quarter hours so I’ve to do some quick math in my head all the time.

In theory timewarrior has me covered on this because it has a summary view that is basically fine but this can not be used to grepped or sorted for certain tickets because it displays the date for each day only once.

Another nifty feature is the timewarrior export function that results in a JSON. The result is somewhat limited though since it will for example not display and durations and there is as far as I know no way to change this.

Demo how the various views or exports of timewarrior look (And yes, not _everything_ I work on is tracked here :P)

This is where jq (a lightweight and flexible command-line JSON processor) comes in. This little tool is seriously underrated and it allows me to change the format and the values of the JSON export on the fly by calculating for example time durations on the fly, reformats start and end dates so import functions of table calculation programs, like LibreCalc, can read the values as date (we all know that Excel reads anything as date already) and displays me the tracked time in quarter hours for each entry so it’s for most cases a no brainer now to backfill another time tracking system with this. The result can also be easily sorted now to find for example times for a specific ticket by grepping for it’s id.

timew export :week | jq -r '["id", "start", "end", "duration", "quarter_hours", "description"], 
    (.[] | 
        # make sure .end is set (may be empty for currently active tracked time)
        .end = (.end // (now | strftime("%Y%m%dT%H%M%SZ"))) |
        .duration = ( (.end | strptime("%Y%m%dT%H%M%SZ") | mktime) - (.start | strptime("%Y%m%dT%H%M%SZ") | mktime) ) |
        # round duration to quarter hours
        .quarter_hours = (.duration / 3600 / 0.25 | ceil*0.25) |
        [
            .id,
            # urks, localtimes are a mess in jq, ymmv - as long as it is consistent off I do not care tho
            (.start | strptime("%Y%m%dT%H%M%SZ") | mktime | todateiso8601), 
            (.end | strptime("%Y%m%dT%H%M%SZ") | mktime | todateiso8601), 
            (.duration | strftime("%T")),
            .quarter_hours,
            (.tags | join(", "))
        ]
    ) |
    @csv'

The resulting csv file can be imported into most table calculation software now or read manually in a more comfortable way.

Timezones are still an issue. There are so many open tickets on jq on this that I don’t even bother.

Ymmv, as usual 🙂

When you have a water cooled computer the last thing you want to see is a message from your CPU driver telling you that it forcefully clamps down power because this means your CPU is throttling down.

Refilling an AIO be quiet water cooling system

This may mean that there is not enough water in your cooler and the CPU starts to overheat. Time for maintenance and a refill!

What we need for this is an external power supply or the pump, a pipe, an adapter, and some sort of filter hopper and of course water for the refill.

The pump is powered by 12V and this model should not be undervolted. Seriously, this one will break when undervolted. 12V is basically what an Ikea LED lights strip power supply will provide. You can also use another PC power supply but this is what I have anyway for a fan providing fresh air for my office.

The hose I used for the pipe is a used DN9 RAUFILAM-E from REHAU that I found in the barn. It costs about ~1 EUR per meter but you can of course buy a “special” hose from your usual PC parts mafia for 10 EUR per meter.

Distilled water should be fine. You can also purchase whatever overpriced holy water you may prefer. I won’t care.

I spare you the details how to remove the water cooler, because I assume you assembled it before and if not there are plenty of other tutorials on the net.

This pump was completely dry after opening the lid with a screw driver. I prepared this contraption held in place with a wire attached to the chandelier. So don’t do this at home. Now I started the pump and added water to the pipe until the pipe was filled.

Now is the time to move and shake the radiator to get all the air out. Do not shake the pump! This takes some time. You’re done when no more bubbles appear.

Don’t forget the seal and screw in the lid while there is still water standing in the hole. Do not use force on the lid, because it breaks easily.

Make sure everything is clean and tidy (and dry) in the end because you don’t want water in your PC. This also helps to see any leaks that may spring. Don’t forget the heat sink compound later or this will be a very short adventure.

When done let the pump run for a little bit to see if any water leaks out.

When everything is assembled again make sure to run a load test and see if any leak springs.

And this is it. The system is able to hold 32°C again where it was hardly able to hold 80°C before.

And as usual, if you break your system you get to keep the pieces.

I’m not responsible for your mistakes.

A new alpha version of Fly Dangerous was released by the amazing @jayleefaulkner over at https://jukibom.itch.io/fly-dangerous introducing multiplayer! together!

Find the dev vlog at https://www.youtube.com/watch?v=UlAslpCJOyI

I somehow never finished this little gem and since I feel somewhat nostalgic today decided to give it another spin. Interestingly this game was ported to various systems including Mac and Linux in 2013 premiering as part of the Humble Double Fine Bundle. This is probably also where I picked it up.

Anyway, uploading this will take some time but you can watch the partially muted recording elsewhere. Won’t upload it here thanks to ridiculous copyright claims.